Wednesday, 4 December 2013

Where to Save Your Money on Makeup Products

                                         
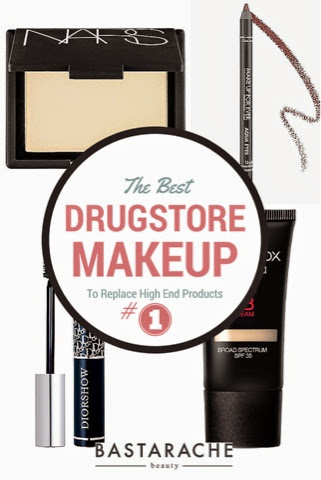
So the holidays are just around the corner, and we all need a little extra cash for gifts, wine, food, winter expenses,wine, wine and maybe some mulled wine. So here is a list of swaps you can do in your makeup bag to give you a little wiggle room!

 PFFFT! Honestly...I don't even by Dior Mascara anymore it's Voluminous all the way, price isn't a factor.

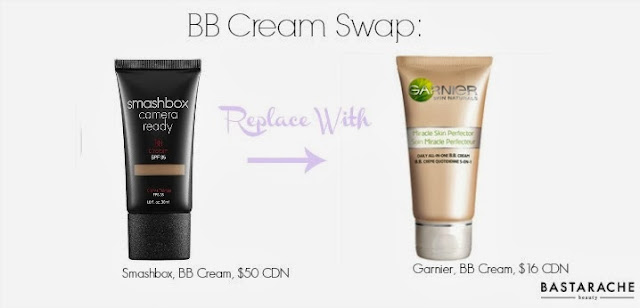
 Only Problem With Garnier...can be slighlty sticky and has fragrance. Would set with powder on T-zone in summer months, winter you will probably be ok as most skin is drier anyways.

 In the wise words of Wayne Goss: " You can do a lot more with bad makeup and good brushes, than with good makeup and bad brushes." Real Techniques are amazing they are designed by a UK makeup artist who knows her stuff. The price is so affordable, I have bought multiple sets in each collection for my kit. Any other brush at this price point I have seen is garbage. So go real techniques or splurge on prestige brushes.

 Maybelline takes a little longer to set then Bobbi Brown, but if you give yourself an extra 30 seconds after drawing on your eyeliner - this will become your go to for gel liners. Sorry Bobbi - price isn't even a factor this, Maybelline just delivers.

Umm..serisously? I could hardly tell a difference when I picked up this NYX primer compared to the UD one I had been buying. I also buy the NYX primer in white ...another product that stays in my pro kit for under $10.00! Amazing!


Prestige Total: $208.00
Smart Girl Total: $62.00
ARE YOU KIDDING ME?! AMAZING. $146.00 in savings. That sounds like a lot of eggnog to me!

Let me know if you would like a where to buy, or have any other drugstore products that captured your heart and saved your wallet!

Thanks for reading!

xx
sj
www.bastarachebeauty.com


Saturday, 16 November 2013

My Top 5 Favorite Makeup Lines

I carry a huge variety of products in my kit, from soo many different makeup lines; however, there are a few brands that pop up in my kit repeatedly. Here are my trusted go-to brands for different products :

Benefit: Great brightners, concealers, highlighters. Great line to give you a glowing complexion. Favorite Mascara!!!


Best of Benefit: They're Real Mascara, Benetint cheek & lip stain, Highbeam Highlighter, Erase Paste-under eye concealer, Hoola - bronzer, Watt's Up - Highlighter


Make Up Forever: Strong line all around, love their complexion products, lipsticks and eye makeup. Cannot go wrong with this line.

makeup forever


Best of Make Up Forever: HD Liquid Foundation, HD Microfinish Powder, HD Rouge Artist Natural, Aqua Eyes Eyeliner, Smoky Extravagant Mascara


NARS: Great line for a beautiful glow and flush and stunning lip products

NARS


Best Of Nars: Blush- Seduction, Highlighter- Albatross, Pro-Prime™ Light Optimizing Primer Broad Spectrum SPF 1, The Multiple-Orgasm


Urban Decay: Go to line for great colored and pigmented eyeshadows. Love the Naked Basic Matte Palette, staple in my kit!

Urban Decay


Smashbox: Beautiful line for the little extras that make all the difference. Great primers, brow products and love the sculpting kit.

Smashbox


Do you see any of your favorite products here? Or did I miss something from one of these lines that you love? Comment below. 

xx
sj
www.bastarachebeauty.com

Friday, 8 November 2013

Beautiful Soft Winter Makeup

I love autumn and winter fashion - I love living in Canada where we get such beautiful seasons - but when It starts to cool off I think fashion and beauty just come alive. This winter is no different - the clothes and makeup are stunning. I will give a full review soon but think warms and neutrals for colours -Caramels, chocolates, burgundies , bronzes with a style ode to the 90 's extremes -very polished and lady like or grunge .
                                  
 On Josee we are clearly leaning towards ladylike -but still very soft. Because she is beautifully fair I opted for light colour choices but still kept them in the warm palette so she didn't look washed out. 

-Recreate this look-


Fall/winter 2013 makeup trends


This look would also look great with another fall trend which is the berry lip! So pretty loving it!
|These are some of my favorite products I use to create new looks all the time - one of my favorite drug store steals right now? Rimmel Lipsticks. The one in this photo is Nude Delight and only cost $3.94 !!

Talk soon!

xx
sj
www.bastarachebeauty.com
Photo Credit: Denis Duquette Model: Josee Hicks

Thursday, 23 May 2013

Summer 2013 Makeup Trends

 I love the season transitions and the new makeup trends they bring. Here is what is hot for this summer and spring: some classics that are always fabulous & some new twists.


#1. MATTE BRIGHT & RED LIPS
Summer trend: Bright, matte lips

#2.LINER
Summer Trend: LINER


#3.BLUE & GREEN EYES
Blue & Green Eyeshadow


#4.GLOWING SKIN
Glowing Skin


#5.BIG LASHES
Big Lashes

Wednesday, 24 April 2013

The 10 Skincare Commandments


These are the rules I live by when it comes to my skin, and when I do break them, my skin punishes me. Comment below if you would like more details on how to follow any one of these commandments.

#1. Wash Your Face 

Day and night, without exception -everyday. Find the appropriate formulas for your skin type and monitor every 5-10 years if you need to adjust your regime as your skin changes with age. If you find you are often too tired at night to wash your face -do what I do, have facial cleansing wipes on your nightstand. No excuses to not wipe your face off when lying in bed.

#2. Don't Smoke

This is an obvious, but your skin is your body's main filter for keeping toxins out, so you are exhausting and aging your skin by making it work so hard to keep the smoke out.As a makeup artist, if I can't tell if a client smokes by just looking at their skin, I usually can tell immediately by touching it -the changes are that tangible.

#3. Exfoliate

Minimum once a week, with a gentle exfoliating, if your skin can handle it, I would aim for at least twice a week to get rid of dead skin reveal new glowing cells and boost circulation.

#4. Get Your Sleep

People under estimate how important sleep is to your skin; however, it should be one of your number one skin priorities. Sleep is the only time when your skin can focus on just nourishing and rejuvenating itself. It doesn't have to protect the same or filter or fight free radicals and UV damage, it can just repair and nourish.

#5. Moisturize

Every skin type needs some type of moisturizer to form a barrier to keep the natural moisture and water in your skin and prevent it from evaporating. If you have oily skin or a lot of breaks out, then you want to find a moisturizer that works against the oil but protects the water in your skin, like a mattifying lotion.

#6. Wear Sunscreen

How many beauty & fashion magazines and gurus say this, but this is one of the most powerful preventative measures against wrinkles, lines, age spots etc. So do it...you'll thank yourself in 10, 20 & 30 years.

#7.Anti-Aging Ingredients:

Look for creams with retinoids/ retinol/Retin-A/Renova/Avage in them for best anti-aging results so far it has the best track record for helping create the look of younger skin.

#8.Oily skin/Break out Ingredients:

Salicylic acid , at least two percent for people with persitant oily skin, or it can be purchased in treatment form to be used directly on breakouts only. Tea tree oil is also great - just soak a q-tip in a little bit and apply it again directly to the zit to help dry it out.


#9. Dry Skin Ingredients:

Hyaluronic acid: A humectant that helps cells stay plump with moisture & an oil such as Aragan oil, Olive oil etc that creates a barrier to keep water from escaping. Petroleum is said to be the best barrier for keeping moisturizer in the face, and I will apply it to my cheeks a couple times in the winter before I  go to sleep if I notice they are getting drier then normal.

#10 Visit A Derm

Sometimes problems, or results wanted, are too big for skincare products. Know when to go see a dermatologist  for dark circles, dull skin, wrinkles & fine lines,age spots, acne and sagging skin. There are a lot of non-abrasive treatments that are technically, more affordable the buying products and products that will never be able to achieve what you want.


If you follow these rules faithfully, you will notice a huge turn around. Depending on what you have been neglecting you may see only small differences at first;however, give your skin about 6 months to get through it's cycles and to really see results. This is how I  started to approach my skin about 7 years ago, and it has only gotten better.

xx
sj
WWW.BASTARACHEBEAUTY.COM
www.sarahjanes.ca

Photo Credit: Robyn for Kravetz Photographics; makeup by Bastarache Beauty.

Friday, 5 April 2013

April Beauty Favorites!

Now this won't be a monthly thing, but do I have, for two months in a row, lot's of new favorite products I want to share with you! So here are the so more products I've discovered that I keep going back to over and over again!

#1. Luster: NOW! Instantly Whitens Toothpaste : $10.00

I know this isn't makeup, or even skincare, but, I got this toothpaste from shoppers, mainly because I saw the allure sticker on it, and I use a whitening toothpaste a couple of times a year to help freshen up, I don't whiten with the kits or anything, just try and take good care of my teeth ;) But I found this probably made the biggest difference out of any whitening toothpaste I have ever bought. I haven't bought any of their other products, but when I need a whitening touch up - I will be getting this again!

 *Great idea for bridesmaids in wedding who want beautiful smiles for all the wedding pictures, but don't necessarily want to spend $50 on teeth whitening kits or $100 + on pro whitening on top of putting money out for manis, pedis, makeup & hair!

#2. Benefit Cosmetics: They're Real Mascara! $29.00

This mascara is seriously competing for my number one spot, I love it. I got a small sample of it and the applicator is amazing, I don't know if the formula is even the best, but the applicator produces such good results- I don't know if I'll be able to go back to a regular applicator again. It has the ball at the tip, for really getting in close and then the traditional applicator underneath for evenly and thoroughly distributing the product. I'm not sure if it comes in waterproof, which is the only thing holding me off from buying it as a permanent fixture in my kit -I need water proof for my brides! Sometimes I forget this at home and have to use a different mascara when I am doing my makeup on the fly - I genuinely notice a difference with this mascara compared to others - I LOVE IT. And even though I don't know if it's water proof or not,so it may not hold up to tears -BUT so far in my experience, with my little beady eyes that are prone to smudging, it doesn't budge. AMAZING!


#3Benefit Cosmetics - Hoola Bronzer. $36.00

This Bronzer is beautiful for fair, light and medium skin tones. It is not orangey like so many bronzer are, but is similar coloring to foundations for darking skin tones, which creates a very natural, very beautiful bronzed look!


#4. Tarte Lipsurgence -Matte Lip Tint $29.00
Tarte - LipSurgenceâ„¢ Matte Lip Tint

I love the new matte trend in makeup, especially on lips with a bold or bright color. The Tarte lip tints leave a beautiful finish, come in great shades and are pretty long lasting. It is probably my go to lip product right now, the rest of the face can be very minimal and bare, with a bright understated lip color -very modern. Only downside; I feel like they can be quite drying, so make sure you are using a good lip balm at night and or underneath as a primer.


#5. Urban Decay -NAKED the basics palette $32.00


Urban Decay - Naked Basics Palette
 As I was saying - I love the resurgence of matte makeup, and that includes eyes. The colors in this pallete are so great for complimenting and bringing out eye blue & green eyes with the foxy shade or brown eyes with W.O.S. and the contour colors are perfect for contouring no matter how natural or dramatic you want it to look. Venus adds a beautiful highlight right where you want it. The perfect on-trend pallete. A new fail-safe product for me.


Hope you enjoy these products as much as I do! Stay tuned for "THE BEST OF SPRING MAKEUP" showing you the top 5 new looks, and the products you can get to update your makeup wardrobe for spring!

xx
sj
WWW.BASTARACHEBEAUTY.COM
www.sarahjanes.ca

Thursday, 28 March 2013

10 Tips - Preparing for your Bridal Makeup

  I had difficulty naming this one, because it's not makeup application tips, but


1. Exfoliation 

If you don't exfoliate regularly, start about 3 weeks prior to your big day. A gentle exfoliater, once or twice a week, will make a huge difference in your skin for you wedding day and help create the perfect canvas for your makeup artist!

2. Makeup Inspiration

When looking for ideas for makeup on Pinterest or in magazines; look for models who have similar coloring, hair color and eye color. These looks will give you a truer picture of how the makeup will look on you. For example: the colors an artist uses for blue eyes will be slightly different then the colors chosen for brown.

3. Touch Ups

If you are concerned about the weather or problem skin affecting the longevity of your makeup, or if you know your wedding day is going to be 8+ hours, considering hiring a makeup artist to stay on site for a few extra hours. Most artists will offer a package to stay for your photos or stay until the reception. This may be a couple hundred dollars of an investment, but it will ensure your other big investments- like your wedding photos, will look good forever.


4. Get Your Sleep 

Most people don't know this but your sleep affects your skin more directly then your diet and hydration. Make an effort to get your sleep leading up to your wedding day for a healthy glow.

5.Dry Skin

If your skin tends to be on the dry side, try this treatment: 3 days before your wedding, at night, gently exfoliate, then apply a thin layer of Extra Virgin Olive Oil to your skin -no it won't clog your pores- the apply a thin layer of Vaseline on any problem areas or extra dry spots, like cheeks. Wash your face well in the morning and reveal baby soft skin.

6. Treatments

Tackle any facials, peels, or microdermabrasion  at least one week before to allow any irritation to disappear.

7. Touch Up Kit

If you aren't hiring your makeup artists to stay for touch ups and your MUA doesn't provide a touch up kit. It's a good idea to create one yourself. Things to include; wedding day lipstick, blotting papers, q-tips, setting powder, concealer, bronzer


8. False Eyelashes

Celebrities wear false eyelashes for every red carpet event and for good reason. They finish eye makeup so beautifully, the translate great in photos, and they help your eye makeup last longer. If you are nervous about using them, opt for ones that are a "natural" design they will blend in the best.


9.Break outs

If you do get a last minute zit; treat it twice daily with Salicyic Acid or tea tree oil until it dries up. Do not pick and do not apply these products to the whole face. Just where the break out is.

10.Lip Color

When selecting your lip color for your big day, keep in mind all the smooching you will be doing. Choose a color only a few shades lighter or darker then your natural lip pigmentation or a neutral color. This will minimize any transfer to your new hubby or your white dress!

Thanks for checking out my tips!

For more information on my bridal packages for 2013 or to see my portfolio please check  out my website: www.bastarachebeauty.com!!!

All the best with your wedding planning and preparing for you new marriage!
xx
sj
WWW.BASTARACHEBEAUTY.COM
www.sarahjanes.ca


Wednesday, 20 March 2013

My Fave Makeup Books


I love my makeup books, I go back to them time and time again for inspiration and to refresh on techniques -it's easy to get stuck doing the same makeup over and  over again.

I have lot's of new makeup artist or makeup artist students contact me asking lots of questions about products, first time rates, breaking into the industry and assisting and I love to humbly share my experiences so far in hopes they will help them be more successful.  As far as I am concerned, the better equipped the makeup artists are out there, the better the competition, the higher the standard and the better results produced. So here is my favorite makeup books for aspiring artists and makeup enthusiasts alike!

#1. Robert Jones - Makeup Makeovers


This book was my first makeup book ever, given to me when I was in grade 9...possibly? By one of my oldest and dearest friends. I love Robert's approach to beauty, I would say his work and makeup style has influenced my makeup style the most. This is great for eveyone, from beginners to intermediate he introduces contouring and shaping the face, eye shapes, color theory, all very natural looks, but if you master them, it's easy to bump up the color or use more dramatic colors for a more dramatic look, the skin he creates is always beautiful! Probably one of my favorite books!

#2. Bobbi Brown - Makeup Manual 

I love the details Bobbi includes in this book. I didn't pay attention much to that makeup techniques she gives, but I thought this was a great book for new artists. She gives great examples for colors to have in your kit for concealers, lipstick etc. As well as particular makeup changes you have to make when working with photography or runway, or bridal. She also talks about building a kit, what you should have, what to have in your portfolio, great book for those who want to makeup artists.

#3 Rae Morris- Makeup , The Ultimate Guide

Rae's makeup - absolutely breathtaking, I didn't really think much of her color theory or skin care techniques but her work is incredible, so she's onto something. This book is great for teaching very specific and specialized looks such as dramatic liner, Asian eyes, colorful eyes, glitter eyes. I think the eyes portion of this book is the strongest component, but it's worth the purchase. It's great for inspiration and the looks have step by step pictures and instructions which is great!

#4 The "Teen Vogue" Handbook: An Insider's Guide to Careers in Fashion

Only one chapter of this book is dedicated to makeup artists and hairstylists, but read the whole thing. It is filled with inspiring stories, break into the industry advice and pep talks from the likes of Karl Lagerfield and Anna Wintour. It's important to have a good understanding too of the other professions in your industry and this book does at such a user friendly level. Must have for people who want to work in fashion.

#5 Ellen Marmur MD - Simple Skin Beauty

Good makeup starts with a good base, and Ellen is so good at teaching you what you need for good skin and how to treat clients skin when you are doing makeup on them. I strongly believe that makeup artists need to have a strong skin understanding to really have strong makeup.


 I have lot's more beauty books, but these are my favorite  ! What about you? Have any you think I missed?


xx
sj
WWW.BASTARACHEBEAUTY.COM
www.sarahjanes.ca 

Photo Credit: Denis Duquette, Model: Mylene


Monday, 18 March 2013

Working with Makeup Artists PT 2

I was lying in bed last night contemplating my last post, and I hope that on ones thinks I am being arrogant, I am the first to admit that I certainly have not "arrived." I am always looking for new ways to expand and grow as an artist and jump at any opportunity to assist or work under anyone who has more experience then me or I can learn from. And it is in that spirit of wanting to grow that I share these thoughts with you.

I suppose...I just wonder, if our approach to creative work is a hindrance in itself to getting us to the next level. How would our images and results change if the photographer treated his shoot like Patrick Demarchelier treats his shoots for Vogue editorials?  Or if MUA's prepared like Pat Mcgrath for fashion weeks around the world? If Models practiced posing in front of their mirrors like Chanel Iman? I know everyone has to start somewhere, and it's important to get experience and build rapport, but why not raise the bar a little each time? Why not take your creative shoots and TFP shoots as seriously as if it were an national campaign for Louis Vuitton?(Even if it doesn't even look close!) Hone your craft, keep raising the bar, and keep putting yourself out there.

Missed part one? Here is the post: http://bastarachebeauty.blogspot.ca/2013/02/working-with-makeup-artists-pt-1.html#.UY0yIEqjGSo

#5. Workspace

Adequate lighting and table space to set up 

Lighting is so huge for makeup preparation, for obvious reasons, a MUA needs to be able to see the face of the client she is working on. Natural lighting is often best, as it can be the harshest if the sun is out and really reveal the pigmentation in the skin, and any blemishes or darkness that need covered.However, if there are no windows, which is not uncommon, any artificial lighting that is as close to assimilating the lighting that will be used for shooting is great. If possible florescent lighting should be avoided, very unflattering. Again, we work with what we are given, but if you can give us light! Please do! Also a small table, even the size of a card table (although a little higher, so we don't have to bend down) seems like a no brainer, but there are more shoots and productions I do that don't have a table then do. Most makeup artist have a system for laying out their products in the order the use them or something similar, again this helps speed things up, so having a space to do that for hair and makeup, you are doing yourself a favor too!

#6. Artistic Etiquette

A photographer would be offended if they saw someone had gone and changed the editing of one of their images, so please don't change the makeup yourself, if you are unhappy with something, confront your MUA, and ask them to change it.

I know confrontation can be scary but it is so important; just as a photographer invests a lot of themselves in their images so do makeup artists into the faces they work on. I personally have not had this happen on a photo shoot, but I have had models change their makeup at fashion shows and they get a strong reprimand from the key artist and the designer who collaborated on the look, but I do know of MUA's who have had this happen to them on a shoot, and it is just bad form. No one has the right to change something about your image; however, they certainly can ask you to edit something for them. It's the same with MUA's, if there is something you don 't like, or isn't quite right, let your artist know what you want changed, they may explain a reason for why they did it that way opposed to another, or they will happily change it. A even worse crime is sending the model to another makeup artist to make the changes, wouldn't it make you feel sick to have your images edited by another photographer behind your back if you could do it yourself?

#7. Feedback

Constructive criticism is imperative to anyone's growth- if we don't know the problem, we can't fix it.

If there was something wrong with my makeup, it melted, or smudged, or faded, and something didn't photograph well, and nobody told me...I would just be so disappointed.I know it can be hard to tell someone something negative, even if it will be helpful to them in the future, so I recommend using the "Encouragement Sandwich Method" Start with one or two positive things, then give the negative, then end on a high not again with something you are happy with. (This works great in marriages too)

 I.E. "I loved how the models skin looked, and the you chose worked so great together - you have a good eye for that... One thing I was hoping for for next time was for the eye makeup to be more dramatic -bump it up with some more color, it was a little too plain once I started editing it , do you see what I mean in the images?... Her makeup lasted great though, hardly had to touch it up at all after you left, stay flawless -great job on that!" See? So not painful!!

#8. Rates

Pricing for services.

I found on a makeup artist website from Halifax, I can't remember who it was so I can't credit them, but a great description of what goes into the rates that a makeup artist will charge, I tweaked it a little but it essentially says the same thing: "Pricing for my services is reflective of my on-going training, education, previous experience, industry research, sanitization, cleaning and preparation of products, travel time and expenses,product replacement and actual labor time."    Furthermore, as most entrepreneurs and creatives know, you are paying your own dental and health bills/insurance,liability insurance, your own EI (optional), you have to pay income tax out of your rate,put money into retirement, and you don't collect any vacation pay. That's why when a client wants to hire me and asks how much it is to do X amount of people, I tell them that I operate by a half day rate or a full day rate, so regardless of whether I am there for 2 1/2 hours or my full 4 hours for a half day, the Rate will stay the same, as the only thing that is reduced is my actual labor time, but all my other overheads stay the same. Also, if things do wrap up ahead of schedule and I can head out an hour or so early, I still have booked that 4 hour or 8 hour time slot for you, and have mostly like turned away other work to be part of your project, as I am my product and service, I can make money only where I am.

That being said, if you are working with a small budget, make an offer towards the asking rate, and perhaps negotiations can be made. Being part of the  close-knit creative Atlantic Canadian community, most want to support what others are doing and are willing to be flexible to build relationships and continue working together on future projects


I think that is all I have to share for now, I am sure I will edit and add more later. Again I hope you all found this to be a resource to help you operate your projects and businesses better!

xx
sj
www.bastarachebeauty.com
www.sarahjanes.ca


Sunday, 10 February 2013

Working with Makeup Artists PT. 1

Sometimes I like to dream about an ideal world, and in particular lately, the ideal world for a makeup artist.

I work with a lot of seasoned pros who know what a makeup artist needs to be his or her most successful, but I still have some photographers who are just starting to work with and appreciate the quality professional hair and makeup can bring to a shoot (I call them my late bloomers.) Regardless, working conditions can't always be ideal, I understand that, and it's part of my training and experience to compensate for that and produce beautiful makeup regardless of if makeup is being done in the back of a car, or in a dimly light room.  However, if you are able to set your makeup artist up to be her most successful, I strongly encourage you to do so!

Here are a few tips to help your artist produce the best possible results. Some of these may sound like no brainers - but, you would be surprised at some of the situations me or fellow work colleagues have walked into. I should put a disclaimer: These are my personal preference, other artists may agree or disagree or have something else to add - and I strongly encourage you to do so by commenting at the bottom :)

I also hope you see my heart in this and don't think I'm being critical, I don't think that I have that tone, but just in case I'll just say I hope you all get my sense of humor and  get some great information to make your images that much better.


#1. A Schedule

Create and communicate your tentative timeline for your shoot. Possible Inclusions; Call time, makeup & hair start &end time, shoot starting time, 2nd look time, any additional looks, expected wrap up time or when team is good to go home.

 Although so many things can come up with shoots that can throw things off schedule, it's ideal to have a vague outline of timing for your shoot and communicate it to your hair, makeup and wardrobe team. I am sure most photographers have a tentative idea in their minds of when they would like to start hair, then makeup, then shoot, then change looks, etc. But often besides a call time, not much more information is given.

One of the reasons why this is so important, especially for photographers starting off, is once you start shooting bigger or commercial clients sometimes your wardrobe team is being paid an hourly rate, the longer things drag on,the more your client is going to have to pay, which they obviously won't be happy about. I also find if I have a "deadline" to aim for it keeps me on my toes and I work faster.

It's also good to have an idea when your team will be done and able to go home, if you want them to stay for touch ups, or look changes or anything, having that all clearly communicated before hand is great for all the other parties involved. Most creatives love what they do and have no problem staying on set to make sure everything is perfect until the end, it's just good to know what expectations are and when you want to wrap everything up.
Part of knowing how long to give for hair and makeup is having a plan for the looks prior to the shoot...


#2. Ideas & Inspirations Communicated before the Shoot

Tell your MUA your vision on inspiration for the shoot, including any (no matter how little of how much) direction you can give them for makeup. The better prepared your MUA is the better results she will produce.
 
Whenever I have a bride hire me, I also do a consultation prior to ensure we are on the same page for vision of her wedding day makeup for her big day. Although a consultation is certainly not required for a shoot, it is important to communicate your vision with your makeup artist before your big day. This allows your makeup artist to design a makeup look,or do a face chart or possibly test it out to see if there is going to be any issues with what you are looking for, and come prepared with a plan in mind for how to do the look and what products to use. This also shaves so much time off of the shoot because your artist won't have to hum and ha about what to use, or how to use it because they SHOULD have figured that all out before they were on your dollar if you gave them the info.

I find most times, clients don't know proper makeup terminology- and why would they, but by even saying things like we want a natural look, or we want dramatic, we want dewy skin, or we want the focus on the eyes etc. this gives your artist something to work with. He or she can start pulling together ideas and condense them into a Pinterest board or some visual reference to share with you, which you can then counter and say yes this is exactly what I am looking for, no wrong direction, or I like these but not these ones, and why - if you know.

I also have an inspiration binder I will bring with me sometimes when a client says they want a "smokey eye" I will bring a binder with different smokey eye looks and ask which one tends to fit their vision best. This method is often used when a photographer hires me for a boudoir, glamor or beauty portrait, as the shoot is the first time I meet the client and their opinion on the makeup and hair is important too, so the creative direction can be outline by the photographer prior to the shoot, but the client paying for the portrait has the last say on how they want to look. This takes a little extra time on both parties side, but is so helpful in guaranteeing great results.

#3. Tech Specs

Lighting? We need to know! The type of lighting you use and how you light the model has specific makeup application requirements to produce the best results.
 
One of the many, many reasons why it's better to hire a professional makeup artist over a makeup enthusiast or friend is because a makeup artist will know how the makeup will translate in different lighting. For example if you are front lighting, the face should be pretty evenly lit up all over, however if you are using harsh lighting, the makeup should be a stronger then soft lighting or a soft box would need.  Or if you're lighting from one side, this can cause shadows on the face and have one side of the face look like it has heavy makeup, while the other has barely anything. Letting your makeup artist know this, she can compensate for it and it's important to show her on a monitor so that everything looks balanced once you start shooting. The makeup application style will change again for outdoor shooting, or back lighting. So more info the better for how you will be shooting and what the images will be used for afterwards.

 #4. Model

Knowing what the models features are is key to successfully desiging a look in advance that will both capture the photographer/creative directors vision, and enhance -not compete- with the models natural beauty.
 
For commercial or fashion work, it is great to send the makeup artist a head shot of the model(s) without makeup with info about the shoot. This also helps the makeup artist be more prepared for arrival if she knows the eye color of the model, what her complexion is like etc.

Once I have worked with a model or even a photographer, a number of times, I have files on my computer to keep notes about their styles or unique needs. If I have a model with dry skin, I will make a note of that as a reminder for when I will need to work with them again I will be prepared, if they have little to no lashes, I will note that, to make sure I have false eyelashes to bring.

And I even have some notes on photographers I work with, things I know they like, or styles they have, obviously things can change and they can want to take something in a different direction then they usually do, but if I know a photographer tends to want me to really contour the models face, I will make a note of that and ask them at the shoot if they are looking for strong contouring. One of the great reasons for building relationships with your hair, makeup and wardrobe team and using the same people frequently is they start to know your style and recognize your work and pay attention to what you like. Which means less work for you -you can focusing on the photography and not having to communicate the details over and over again to a new team.


So this is getting quite longer, and I have about 10 ideas to share, so I am going to break it up into a couple of posts. I hope this was not boring for you but that it gave you some great ideas on how to take your makeup artists, hair stylist and wardrobe stylist to the next level!

Please comment below, especially photographers or makeup artist who may disagree, agree, having something to add or questions to ask.

Stay tuned for part 2 !

xx
sj
www.bastarachebeauty.com

Favorite Products February 2013

I always love hearing about what other makeup artist are using in their kits, or what their new favorite products are. So I thought, maybe some of you enjoy them just as much as I do so I will share some of my favorite products this month.

First of all, eyes, I have been feeling more tired and haggard then usual lately so I have been really looking and trying out products to help with fine lines around the eyes, dark circles, bags etc.

EYES:

TREATMENT: TimeWise® Firming Eye Cream $40.00

WHY: I find in this winter I need to use an eye cream on a regular bases. Even though I am still quite young, I am starting to notice the texture of my skin changing. This is a rich formula that feels so amazing and smooth once applied, may need to opt for something else during the summer months, but for the cold winter and spring, this helps my eyes look less tired and my skin more supple. I love the way my eyes look and feel after this cream!

COVERAGE: DuWop Circle Block $28.00   

WHY: This product is amazing for all the tired ladies out there. It has two formulas for amazing results! First is the peachy water-resistant color correcting base, that primes the under eye and neutralize dark blue/purple/grey tones. Second is the concealer which you apply over the base and it matches your skin tone. Absolutely amazing. I recommend this to all my clients who have to deal with dark circles, it's the best system I've seen yet and it really makes a difference.


FACE:

Make sure you are moisturizer your skin, this weather will strip it dry!

INSTRUMENT FROM HEAVEN: My all-time, obsessed with,  new favorite product, I feel inept to do makeup with out it; Beauty Blender $26.00


WHY: I don't know except that it makes skin look amazing. IT IS MAGICAL. BUY ONE. Spray it with some water or wet it so it's damp, apply liquid or cream makeup (foundation, cream blush) and just love your face.  I need 20 of these in my kit.

BLUSH: Bella Bamba, Benefit Cosmetics $28.00


WHY: So pretty! It's light, but it adds warmth to the face because of the gold shimmer. I love a little bit of gold shimmer in blush just adds such a pretty glow to the skin. This pink is great because it is very versatile in coloring, not too cool and not too warm. It's my go to blush when I am doing my makeup half asleep and don't want to think about colors coordinating.


LIPS

Exfoliate with some H20 and baking soda on your kissers and stick to moisturizing lipsticks or yummy glosses , if it's not too windy ;)

GLOSS: DuWop Lip Venom in Pink Champagne $18.00


WHY: So long lasting, so yummy tasting/smelling. Plums lips, moisturizes lips, fills in lines in lips, really high shine and beautiful colors. I want them all!


  WHERE TO BUY:

DuWop:, Shoppers Drug Mart, 45 Vaughan Harvey Blvd, Moncton NB www.duwop.com
Mary Kay: Susan Britton at susan@trimediatlantic.com, www.marykay.ca
Benefit:  Shoppers Drug Mart,18 Champlain St, Dieppe NB,  www.benefitcosmetics.com
Beauty Blender: Sephora, Champlain Mall,  477 Paul St, Dieppe www.sephora.com


 Happy shopping and feel free to get in touch if you have any questions!

xx
sj

www.bastarachebeauty.com